Google Search

Hardware Lesson 4

IDE storage device
All our storage devices such as hard disk, CD/DVDs are called IDE because electronic circuitry required for these devices to function are already integrated into them.

Hard disk
Physical Structure of a Hard disk
-Inside the Hard disk we can find metal disc’s called platters. These platters store all or our data. Data is stored separately on both sides of platter (Top and Bottom).
-The R/W heads store data into the platter. Each platter has 2 R/W heads one for the top and other for the bottom.
-According to the total capacity of the hard disk it can have 2 or more platters.
-Each platter is divided into logical ring called Tracks. These tracks are further divided into small setions called sectors.
-All data saved in the hard disk is saved into these sectors. Each sector can hold up to 512bytes of data.

Partitions (Drives)
-Before using the hard disk e need to first create partitions and then format.
-Partitioning means to divide a single hard disk into multiple logical pieces for easy storage of our data. At least one partition must be created.
-Partitions can be created according to type and sizes.
-the following types of partitions can be created:

1. Primary Partition:
-This is the first and main drive ( c: )
-For operating system to be installed and booted at least one partition is required.
-Up to 4 primary partitions cab be created.

2. Extended partition.
-This is more of a storage container than actually a drive. It is used to store logical drive.
-Using logical drives we can create up to 24 drives. (d: e: f: ……z: )

3. Logical Drives
-These are the drives created inside the extended partition.

Dynamic Volumes
-If we want we can convert our hard drive to dynamic disk.
-using this we can create dynamic volumes such as;

1. Simple volume
-This is the same as primary or logical drive.

2. Spanned volume
-This can be used to connect free spaces of up to 32 hard disks and crate a single drive.

3. Mirrored volume
-This is mainly used for creating a backup copy of the primary drive into a drive located in the second hard disk. In case the first hard disk is damage we can use the second hard disk to start the computer.

4. Striped volumes.
-this can be created suing 3 to 32 harddisks.
-The striped volumes provide faster read/write performance compared to other drivews.
-When we save files into a striped volume it is divided into pieces and each pieces is saved into a separate drive, this makes saving faster.
-and when we open files all drives together open the files, making reading process faster.
- But if a single hard drive were to fail then all data will be lost.

5. Stripped with parity.
-This is the same as striped but it also provides fault tolerance.
-if a single hard disks fails then it can be replaced with a new one and all data can be restored.

Formatting
-After creating drives we need to format each drives.
- formatting will create a file system table which stores information about which files are stored in which tracks and sectors of the hard disk.
-the following types of file system are available;

1) FAT: File Allocation Table 16
- This is the oldest type of file system used mainly in Windows 95 and Windows 98.
-This supports maximum drive size of up to 2.1 GB.
-Now a days this is only used for pen-drives or memory card.

2) FAT32
-This is the advancement of FAT16
-It can support maximum drive size of up to 32GB.

3) NTFS
-This is the currently used file system.
-It has many advantages compared to FAT file system.
-It can support maximum drive size of upto 2 Terabytes.
-Also it has many extra features such as ;
a. compression
b. encryption
c. NTFS file/folder permission
d. Disk Quota

Hardware lesson 3

Power Connections from SMPS to Devices
There are 2 types of SMPS (Switch Mode Power Supply).
1) AT SMPS
2) ATX SMPS

AT SMPS
- Has 6+6=12 pin connector from SMPS to Mother board.
- The power supply connector having written P8 & P9.
- While connecting P8 & P9 connector from SMPS to mother board Black colors wire of P8 & P9 connector's co-inside each other.

ATX SMPS
- Comes with 20 Pin single connector, i.e. P1 connector from SMPS to mother Board.

POWER CONNECTOR
1. AT power connector
Hardware lesson 3-
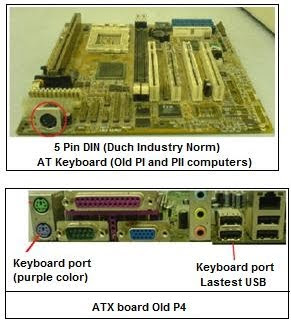
AT motherboards uses the P8 and P9 power connector
-When connecting the P8 and P9 keep the black wire together.

2. ATX Power connector
Hardware lesson 3-ATX motherboard uses P1 power connectors and P4 power connector.
-Latest boards uses (24pin) P1 and P4 Power connector.

3. PATA power connector
Hardware lesson 3-For PATA drives we need to connect white Molex connector.
-For example PATA hard disk, CD/DVD Drive.
4. SATA power connector
Hardware lesson 3-For SATA drives we need to connect black Molex connector.

5. Mini Power Connector
-used to supply power to floppy drives.

DATA CABLES

34 Pin Connector
- 34 Pin connector on Mother Board to connect Floppy Disk drive (FDD).
- Through single 34 Pin connector, We can connect two Floppy Disk Drive.
- To connect FDD to Mother Board, We use Flat Ribbon Cable.
Hardware lesson 3
40 Pin Connector (PATA)
- On Mother Board there are two 40 Pin connector to connect Hard Disk(HD), CD-ROM Drive, CD-R/W Drive.
- Through single 40 Pin connector, We can connect 2 devices.
Hardware lesson 3

Hardware Lesson 2

Motherboards
Motherboards are considered as the backbone of the computer, which provides us with an interface to connect our devices internally and externally.
There are 3 types of mother boards:-
1. AT : Advanced Technology
2. ATX: Advanced Technology Extended
3. BTX: Balance Technology Extended


AT Motherboards: (click picture to see bigger size)
motherboard

· These are oldest type of motherboards.
· Mainly used in Pentium 1 and Pentium 2 computers.
· They had only one build-in port for the keyboard. (5 pin DIN). All other ports had to be connected separately.
· Not used now a days.

ATX Motherboards: (click picture to see bigger size)
Hardware Lesson 2
· These are currently used types of motherboards.
· It has many built-in ports for mouse, keyboard, USB, Video, audio etc
· It come in 2 sizes :
1) Micro ATX (small)
2) Full ATX (Large) -Large boards have more slots and are more expensive.

BTX Motherboards (click picture to see bigger size)
motherboard
· These are same as ATX the only difference is that it is designed in a way to reduce heat generated by devices.
· Its slots are placed in a manner to prevent one devices’ heat form affecting other devices. (it is kept little far from each other)

Hardware Lesson1

PORTS
These are located on the backside of the motherboard and are used to connect external devices. There are 3 types of ports:
A. Legacy multifunction ports
B. Standard single function ports
C. Modern multifunction ports

A. Legacy multifunction ports:
1) Serial Ports:
Hardware Lesson1
· It comes in 2 types à 9 pins and 25 pins.
· These ports are not used by latest devices.
· It supported devices like mouse, label printers, external modem, etc.
· Now-a-days we might have 9 pins serial port on the motherboard.

2) Parallel Port:
hardware
· This is also known as printer port.
· It supported devices such as printers, scanners, external/hard disk, CD Drives etc.
· Not used anymore.

B. Standard Single function ports:
1. Keyboard Port

hardware


2. Mouse Port
hardware


3. Video Port
hardware

4. Audio port
hardware

5. Modem port
hardware
Modems are devices used to connect to dial up internet or VPN network using our telephone line. Modems have 2 ports line-In and Line-out.


6. Network Port:
hardware
These ports are found on network cards and are used to create a computer network.


C. Modern multifunction ports:
1. USB (Universal Serial Bus)
· All latest devices connect to the USB port.
· It supports a wide range of devices such as printer, scanners, digital cameras, pen drive, external drives, mouse, keyboard, mobiles etc.
· There can be 2 or more USB ports on a motherboard. Also we can use USB HUBS to increase our ports.
· USB also supports Hot-swapping. (hot swapping; we can connect or disconnect at any time even when running a computer)
· USB can supports daisy chain connection, USB can support up to 127 devices through daisy chain.

2. Fire wire (1394)
· Fire wire is the advancement of USB and can support much faster speeds.
· It also supports devices such as USB.
· It supports Hot Swapping and daisy chain of up to 63 devices.

DOS Lesson 1

1. Dir (Directory)
-This command is used to view a list of all files and folder in the current location.
Syntax: dir
Also we can use dir command with extension according to our use
Dir/p (used to view in page wise format)
Dir/a (used to view files according to its attribute such as H for hidden, S for system and R for read only.)
Also we can search for files according to name and type.
Syntax: dir N*.* (This will only show file names starting with the letter N.
Syntax: dir *.jpg (This will only show jpg files)

2. Cd (Change Directory)
-used to open or close folders in dos.
Syntax: cd folder name
Example: cd windows (this will open windows folder)
Syntax: cd.. (Used to close single folder)
Syntax: cd/ (used to close all folders at once)

3. Md (Make Directory)
-Used to create new folders form dos.
Syntax: md folder name
Example: md city (this will create a folder named city)
Example: md city country college students (this will create 4 folders at once)

4. Rd (Remove Directory)
-Used to delete folders.
Syntax: rd folder name (This will delete any empty folder)
Syntax: rd folder name /s (but to delete a folder with files inside we need to use /s extension)

5. Copy con
-used to create new text files in dos. It cannot be used to edit.
Syntax: copy con filename.txt
Example: copy con city.txt
-then type the all required information.
-To save press F6 and enter.

6. Edit command
-used to create or edit text files.
Syntax: edit filename.txt
(Then type all required information. Then to save click on file>save>exit.)

7. Del
-used to delete files from DOS
Syntax: del filename

8. type
-Used to view text files from dos.
Syntax: type files name.txt
9. cls command
-used to clear screen.

10. Changing drive in dos
-to go from one drive to another type the drive letter followed by a:
Syntax: D: (this will change dos prompt to d drive.)

11. Time : used to change system time

12. Date : used to view or change system date.

DOS Lesson 2

13. Copy
-used to copy paste files from one location to another.
Syntax: copy filename location
Example: copy city.txt d:\town
(This will copy files to town folder in d drive)

14. Move
-Used to cut paste files form one location to another.
Syntax: move filename location
Example: move city.txt e:\student
(this will cut and paste files to student folder in E: drive

15. Format
-Used to format drives from dos.
Syntax: format dirve filesystem
Example: format d: /FS:NTFS
Example: format d: /FS:FAT 32

16. Convert
-Used to convert fat file system
Example: convert D: /FS:NTFS

17. Attrib
-Used to modify file attributes.
H(Hidden), R (Read only), S(System)
(+) means enable
(-) means disable
Example: attrib +h filename (this will make file hidden)
Attrib -h file name (This will make unhide file)

18. Color
-Used to change foreground and background color of DOS.
Example: color 1
Example : color 1A
To view help for color codes use color /?
Example: color /?

19. Ren
-Used to rename files.
Syntax: ren oldname newname
Example:ren city.txt town.txt

20. Chkdsk
-Used t oscan drives for errors.
Example Chkds C:

21. Defrag
-Used to defragment drives from dos.
Example: defrage d:

22. net user command
-Used to creat users from dos.
Syntax: net user username /add (this is used to creat a windows user)
Syntax: net user username password /delete (this is used to delete windows user)

23. Help
-Used to view a list of basic command that can be used in DOS.

24. /?
-Used to get help for specific commands.
Example: dir/? (used to get help for dos)

25. Exit
-Used to close DOS.

DOS command Lesson 2

13. Copy
-used to copy paste files from one location to another.
Syntax: copy filename location
Example: copy city.txt d:\town
(This will copy files to town folder in d drive)

14. Move
-Used to cut paste files form one location to another.
Syntax: move filename location
Example: move city.txt e:\student
(this will cut and paste files to student folder in E: drive

15. Format
-Used to format drives from dos.
Syntax: format dirve filesystem
Example: format d: /FS:NTFS
Example: format d: /FS:FAT 32

16. Convert
-Used to convert fat file system
Example: convert D: /FS:NTFS

17. Attrib
-Used to modify file attributes.
H(Hidden), R (Read only), S(System)
(+) means enable
(-) means disable
Example: attrib +h filename (this will make file hidden)
Attrib -h file name (This will make unhide file)

18. Color
-Used to change foreground and background color of DOS.
Example: color 1
Example : color 1A
To view help for color codes use color /?
Example: color /?

19. Ren
-Used to rename files.
Syntax: ren oldname newname
Example:ren city.txt town.txt

20. Chkdsk
-Used t oscan drives for errors.
Example Chkds C:

21. Defrag
-Used to defragment drives from dos.
Example: defrage d:

22. net user command
-Used to creat users from dos.
Syntax: net user username /add (this is used to creat a windows user)
Syntax: net user username password /delete (this is used to delete windows user)

23. Help
-Used to view a list of basic command that can be used in DOS.

24. /?
-Used to get help for specific commands.
Example: dir/? (used to get help for dos)

25. Exit
-Used to close DOS.

Types of RAM

1. EDO RAM (Extended Data Out)
-This comes in capacity of 8MB and 16MB
-It runs at speed of 66 MHz
-It uses SIMM slots.

2. SDRAM (Synchronous Dynamic RAM)
-It comes in capacity of 16MB, 32MB, 64MB, 128MB and 256MB.
-It runs at a speed of 100,133,166 MHz

3. DDR-SDRAM (Double Data Rate) -It comes in 3 types
DDR1 –Capacity of 256MB, 512MB, and 1GB.
Speed of 200, 266, 300, up to 400 MHz

DDR2 –Capacity of 512MB, 1GB, 2GB, 4GB.
Speed of 400 up to 800 MHz

DDR3 –Capacity of 1GB, 2GB, 4GB, 8GB and 16GB.
Speed of 1GHz and higher.

4. VRAM/WRAM (Video RAM/Windows RAM)
-These are used to graphic memory in graphic cards.
-VRAM comes in capacity of 8, 16, 32 MB.
-WRAM comes in capacity of 32, 64, 128 and 256 MB.
-Latest graphic cards now are DDR2/DDR3 technology.

Types Of CPU

1) Pentium I - Speed 60 to 160 MHz,
Voltage Consume 5V to 3.3V,
Socket 4, Socket 5, Socket 7 (To recognize)

2) ) Pentium Pro Processor – Used because of Server Network.
Speed 150MHz to 200 MHz,
Voltage Consume 3.1V to 3.3V,
Socket 8 (To recognize)

3) Pentium II - Speed 233 MHz to 450 MHz,
Voltage Consume 3.3V,
Socket 1 (To recognize)

4) Pentium III - Speed 450 MHz to 1.26 GHz,
Voltage Consume 3.3V,
Socket 1, PGA370

5) Pentium IV - Speed 1.3 GHz to 3.2 GHz,
Voltage Consume 3.3V,
Socket PGA423, PGA478

Celeron Processor
1) Celeron (Pentium II Base) - Speed 266MHz to 700 MHz,
Voltage Consume 3.3V,
Socket 370 and Slot 1

2) Celeron (Pentium III Base) - Speed 533 MHz to 700 MHz,
Voltage Consume 3.3V,
Socket 370

3) Celeron (Pentium IV Base) - Speed 850MHz to 2.4 GHz,
Voltage Consume 3.3V,
Slot 1 & Socket 370

Xenon Processor (Used in Server Based Network)

1) Xenon (Pentium II Base) - Speed 400 MHz to 450 MHz,
Voltage Consume 3.3V,
Socket used is slot 2

2) Xenon (Pentium III Base) - Speed 500 MHz to 1 GHz,
Voltage Consume 3.3V,
Socket used is slot 2

3) Xenon (Pentium IV Base) - Speed 1.4 GHz to 3.06 GHz,
Voltage Consume 3.3V,
Socket used is socket 603

4) Xenon MP - Speed 1.4 GHz to 2 GHz,
Voltage Consume 3.3V,
Socket used is socket 603


Itanium Processor (Used in Server Based Network)
Speed 10 GHz to 20 GHz,
Voltage Consume 3.3V,
Socket used is socket 418 & 611

BIOS password

BIOS Recovery Password.
Did you Forgot your BIOS password? No Problem! Follow this way...
1st way: Remove all power cables and remove the CMOS battery for a few seconds.
-Then reconnect, the password will be deleted also all setting will be reset

2nd way: BIOS passwordWe can also use the BIOS Jumpers located on the mother board to remove password.
-Change the jumper location form normal to recovery and switch ON.
BIOS will auto open and we can delete or change password.
-After changing password shutdown the computer and replace jumper to normal.

BIOS Lesson

What is BIOS ?
-BIOS is the software located in the system ROM Chip of the motherboard. The BIOS is used to control the system boot process and device settings. Also BIOS initializes the operating system boot process.
(BIOS) Basic Input Output System (software)
(CMOS) Complementary Metal Oxide Setup (Battery)

SYSTEM BOOT PROCESS:
Stage 1 – CPU wakes/power on
When we press the power button electric charge is sent into the CPU and it switches on. Then the CPU starts the BIOS.

Stage2- Post Process ( Power on self test)
-Then the BIOS runs the post process
-Post will scan for all devices connected to the system and will check power supply and device status.
-If all devices are working properly then the next stage will be loaded. If there are any errors then POST error codes will be given.

POST ERROR CODES
-Error codes can be of 2 types; Beep codes or Numeric/Text codes.
Beep Codes:
1. A single happy sounding beep means that all devices are functioning properly.
2. A long repeating beep means problem with system RAM. Check RAM and RAM slots.
3. One long and 3 short beeps means problem with display. (Graphic card)
4. A rhythmic beep means thermal heating. (CPU overheat)

Numeric/Text Codes:
100 series error (100-199) -Motherboard
200 series error (200-299) -RAM
300 series error (300-399) - Keyboard
400 series error (400-499) - B/W video
500 series error (500-599) -Color Video
600 series error (600-699) -Floppy drive
1700 series error (1700-1799) -Hard Drive

Stage 3- Operating System loading
-If the POST was successful then the BIOS will located the System Boot device.
-Then the Boot process is handed over to the operating system. Then OS Boot Process is started.

IMPORTANT BIOS Settings
1. Date and Time
-The system date and time is controlled and stored in the BIOS.
-if the time is changed in BIOS it is auto changed in windows and vice versa.
-if the time is running slow or always shown incorrectly it means that the CMOS is low in power, needs to be replaced.

2. Drive Configuration
-After connecting hard drives, CD/DVD and floppy drives they need to be initialized in BOIS in order to function.
-Now a day’s all BIOS have auto detect function for drives.
-If we want we can also disable drives from BIOS.

3. Boot Device Priority/ Boot Sequence.
-Boot sequence is the order in which the computer searches for a boot device.
-The Boot device is the device in which our operating system is stored.
-The Default Boot Sequence is :
1st Boot Device: Floppy
2nd Boot Device: Hard Drive
3rd Boot Device: CD/DVD
-For new installation, we use CD/DVD device as the 1st boot device.

4. Supervisor and user password
Supervisor Password:
if we set this then every time we try to open BIOS we will need to enter the password or else BIOS will not open.
User Password: If we set this, then every time we switch ON the computer will need to enter this password or else the computer will not boot.
These passwords are used to prevent unauthorized access to the computer or BIOS.

5. Port Configuration
-Through BIOS we can enable/disable all ports such as serial, parallel and USB.
-We can also change speed for USB ports to Hi Speed (480 Mbps) or Full Speed (12 Mbps)

6. CPU Configuration
-Also some BIOS will display the CPU specification and temperature details.

7. Load BIOS Defaults.
-This can be used to reset the BIOS to the default factory setting.

8. Load optimum setting
-This will auto set all settings for us.

9. Save and Exit (F10)

10. Exit Without Saving (Esc)

Entering BIOS
-During startup we need to press the associated key on the keyboard.
-this key differs according to the type of motherboard.
-It can be any of the following;
Del, F1, F2, F9, F12

hit counters
website-hit-counters.com

Choose any

SEO

free web site traffic and promotion